HOW TO: CLEAN INSTALLATION - CHECKPOINT 2200 GAIA OS (2012 Devices) Over USB. (Or do more...)
How to do clean install GAIA CheckPoint 2200 To R77.30 or R80.40
Have your CheckPoint Support Account Ready (to get files if you dont have in hand)
WIZARD
https://supportcenter.checkpoint.com/supportcenter/portal?eventSubmit_doShowupgradewizard
Check Point R77.30 (Recommended):
https://supportcenter.checkpoint.com/supportcenter/portal/role/supportcenterUser/page/default.psml/media-type/html?action=portlets.DCFileAction&eventSubmit_doGetdcdetails=&fileid=53393&from=wizard
R77.30.01 Check Point Hotfix for Gaia OS (If you plan to upgrade to R80.40 via GUI - See Below)
https://supportcenter.checkpoint.com/supportcenter/portal/user/anon/page/default.psml/media-type/html?action=portlets.DCFileAction&eventSubmit_doGetdcdetails=&fileid=45888
Check Point R80.40:
CLEAN USB INSTALL
- Get Recommended iso
Check Point R77.30:
Check_Point_R77.30_Install_and_Upgrade_T5.Gaia.isohttps://supportcenter.checkpoint.com/supportcenter/portal?eventSubmit_doGoviewsolutiondetails=&solutionid=sk104859#Gaia%20Downloads
Get Latest Hotfix (Install From GUI)
Check_Point_R77_30_JUMBO_HF_1_Bundle_T351_FULL.tgzhttps://supportcenter.checkpoint.com/supportcenter/portal?eventSubmit_doGoviewsolutiondetails=&solutionid=sk165456
- Get Recommended iso
Check Point R80.40:
Check_Point_R80.40_T294.iso
https://supportcenter.checkpoint.com/supportcenter/portal?action=portlets.DCFileAction&eventSubmit_doGetdcdetails=&fileid=101083
Get Latest Hotfix & Deployment Agent Packs
Jumbo Hotfix Accumulator for R80.40 (R80_40_jumbo_hf)
https://supportcenter.checkpoint.com/supportcenter/portal?eventSubmit_doGoviewsolutiondetails=&solutionid=sk165456
For Freshly installed Open Servers, first use the R80.40 ISO image from the R80.40 Home page and then, before placing the machine into the production environment, install the R80.40 Jumbo Hotfix package from the below table (not the Blink image).
R80.40 Jumbo Hotfix Accumulator General Availability (Take 67)
https://supportcenter.checkpoint.com/supportcenter/portal/role/supportcenterUser/page/default.psml/media-type/html?action=portlets.DCFileAction&eventSubmit_doGetdcdetails=&fileid=107407
Check_Point_R80_40_JUMBO_HF_Bundle_T67_sk165456_FULL.tgz
And deployment package for it. (Below is for 181 build, 152 asks for CPuse ho
https://supportcenter.checkpoint.com/supportcenter/portal?eventSubmit_doGoviewsolutiondetails=&solutionid=sk92449#Latest%20build%20of%20CPUSE%20and%20What%27s%20New
DeploymentAgent_000001931_1.tgz
- Get ISOMorphic Tool.
Make sure that USB key that you use is a USB 2.0 and that USB does not identify itself as fixed disk.
For 77.30 You need a 4GB USB
For 80.40 You need a 8GB USB
For 80.40 use Build 181: https://supportcenter.checkpoint.com/supportcenter/portal?eventSubmit_doGoviewsolutiondetails=&solutionid=sk65205
For 77.30 you can also use Build 152 (Tested OK with 2200)
https://supportcenter.checkpoint.com/supportcenter/portal/user/anon/page/default.psml/media-type/html?action=portlets.DCFileAction&eventSubmit_doGetdcdetails=&fileid=12648
Write down if you havent already your MGNT MAC Address and IP you want to set (instead 192.168.1.1) in the format xx:xx:xx:xx:xx:xx
- Get Latest SmartConsole (For your version)
Check Point R80.40:
Check_Point_SmartConsole_R80_40_jumbo_HF_B407_Win.exe
https://supportcenter.checkpoint.com/supportcenter/portal/role/supportcenterUser/page/default.psml/media-type/html?action=portlets.DCFileAction&eventSubmit_doGetdcdetails=&fileid=107475
Check Point R77.30:
Check_Point_SmartConsole_and_SmartDomain_Manager_R77.30_T204_Windows.exe
https://supportcenter.checkpoint.com/supportcenter/portal/role/supportcenterUser/page/default.psml/media-type/html?action=portlets.DCFileAction&eventSubmit_doGetdcdetails=&fileid=41356
STEPS:
Prepare your USB.
Use a tool like MiniTool Partition Wizard to delete all partition and format as FAT32 your USB
Set to start as admin the ISOMorphic Tool
Use below Steps (ISOMorphic Steps Credit to Support Center CheckPoint)
- Select Iso
- Set if you want custom config. You need the MAC, IP for MGNT (cant be same with one you will use with your LAN connection, set mask.
- Cant add any hotfixes
- Select USB and continue as per below
- Select Iso
- Set if you want custom config. You need the MAC, set as basic and standalone if will be ALL ONE Machine, hostname ex gw-2200, IP for MGNT (cant be same with one you will use with your LAN connection, set mask.
- Add latest hotfix pack and deployment pack
- Select USB and continue as per below
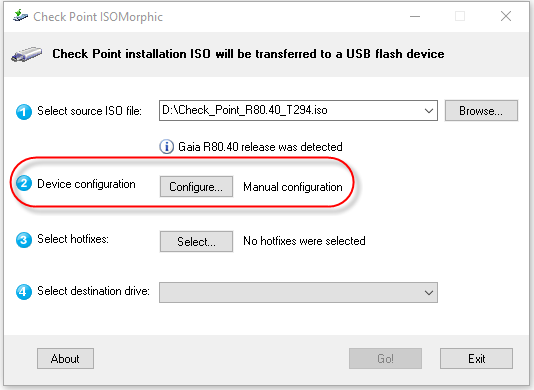
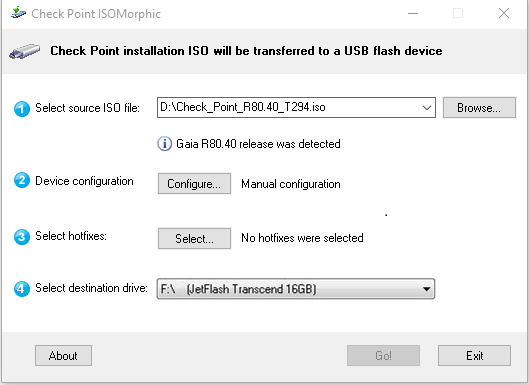
In the 'Select source ISO file' field, browse for the Gaia ISO file.
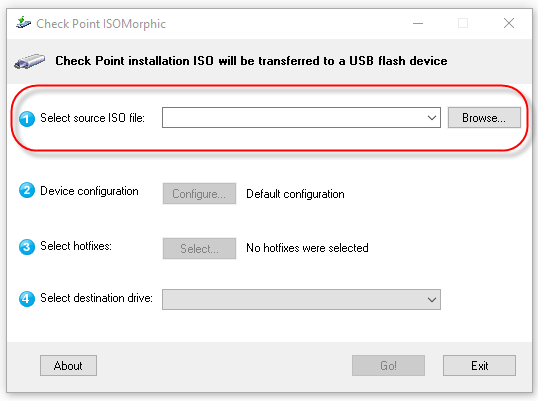
Press ‘Configure’ in order to configure your devices.
If you want to make this USB installation valid for any Check Point appliance, double-click the default entry (Any), or click the 'Add' button for a specific appliance.
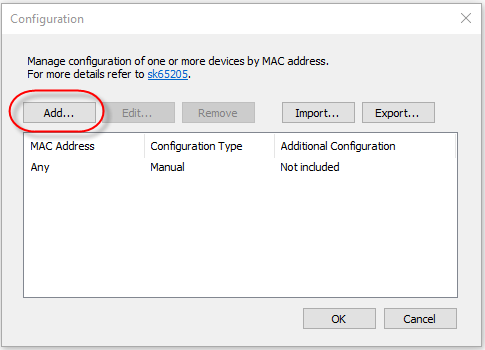
Type the MAC address of the device you want to install (in case of a specific device).
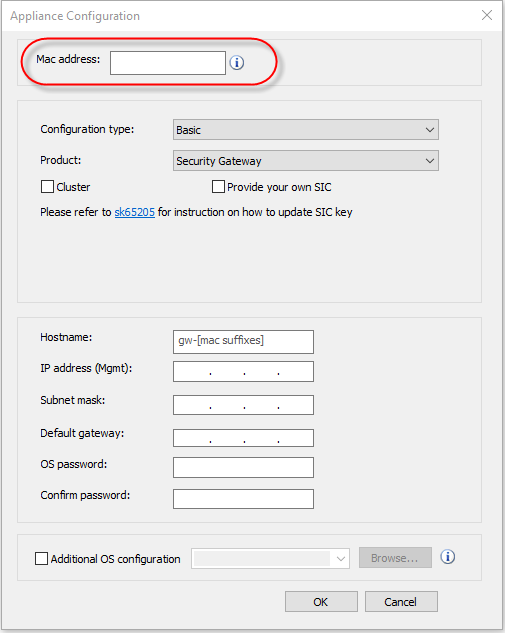
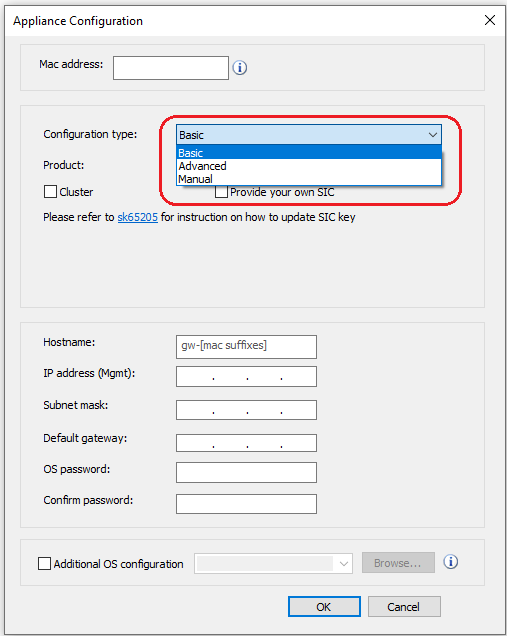
Choose your configuration type. This can be Basic, Advanced, Manual:
Basic: You will be able to use pre-defined templates for Security Gateway, Security Management or Standalone (both). Select your product and provide the required info. This will run First Time Wizard with the requested configuration after installation.
Advanced: You will be able to provide a config_system configuration file of your own. This provides you with the means to install any type of Check Point product. First Time Wizard will run with the provided configuration (config_system) after installation.
Manual: You will be asked to perform the First Time Wizard manually after installation completes.
Note: you can choose to provide your own SIC key (in case of gateway installation) or Administrator password (in case of Management installation) and they will be written clear-text on the usb device. By default, the device will randomize these and you'll need to access it after installation and configure them yourself by using the 'cpconfig' command.
Starting from R80, to change the Administrator password, use the mgmt_cli set administrator command. Refer to Management API Reference.
Providing FTW settings to Isomorphic utility results in unattended running of config_system during both Gaia installation and appliance restore to factory defaults.
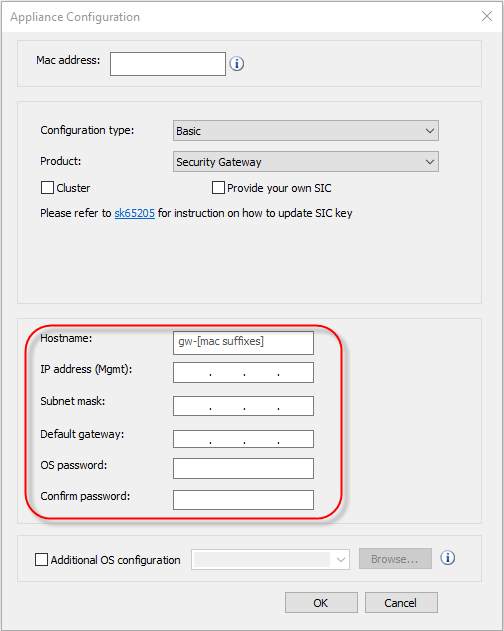
Configure network access to your device: Hostname, IP address, Default gateway and administrator password:
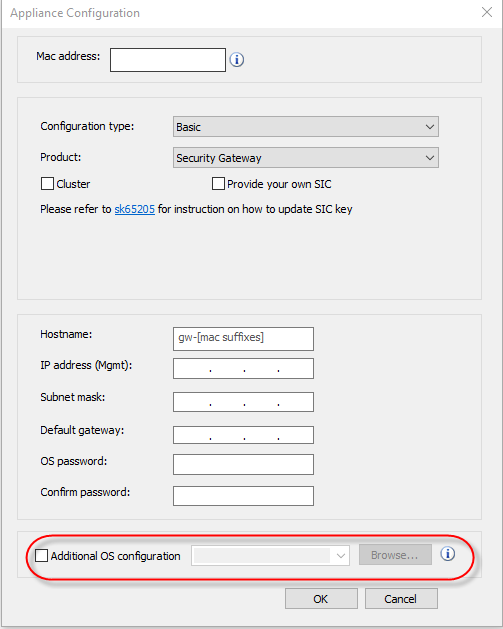
Select the ‘Additional OS configuration’ checkbox if you want some additional configuration to be applied after First Time Wizard (Basic/Advanced modes) or after after installation (Manual mode). This should be a valid clish script.
Important Note: This clish script should not include any configuration that requires reboot.
Click OK to proceed.
Select your HotFixes by clicking the ‘Select’ button:
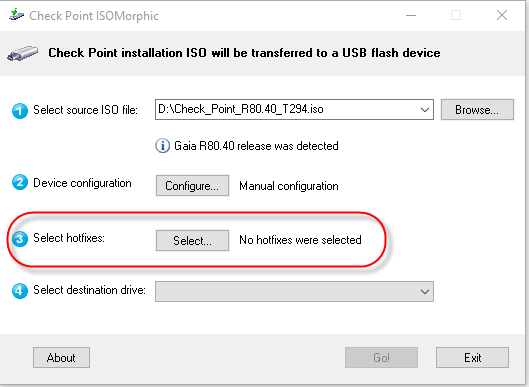
Now click the ‘Import’ button and select your hotfixes.
Note:
These should be CPUSE packages. Order is important, make sure it is valid, or consult Check Point support site.
ISOmorphic tool will require to supply offline CPUSE agent tgz file in addition to requested Hotfixes.
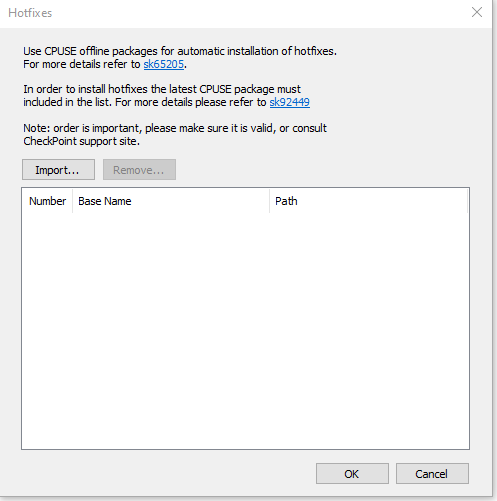
Click OK to continue
In the 'Select destination drive' field, select the USB device drive.
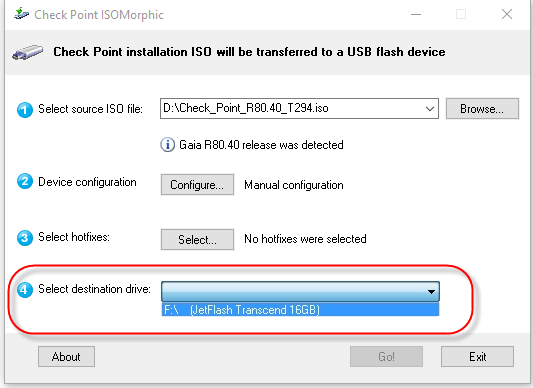
Click Go!
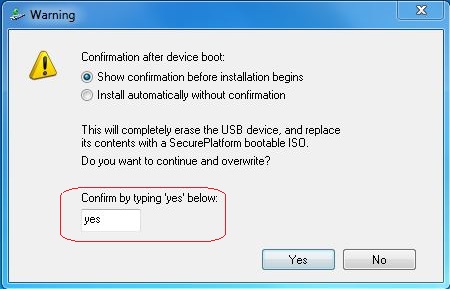
Do you want installation to be interactive or unattended? Select your choice:
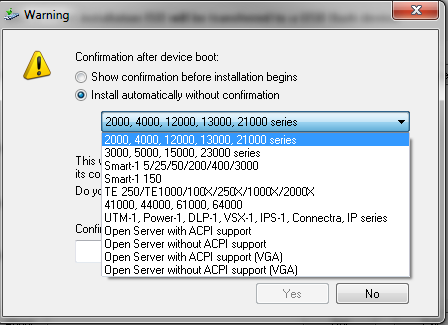
If you choose an unattended installation, you will see the following warning:
This will completely erase the USB device. Type ‘yes’ if you’re sure you want to continue.
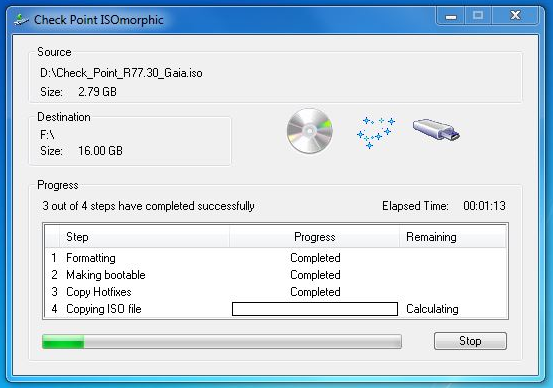
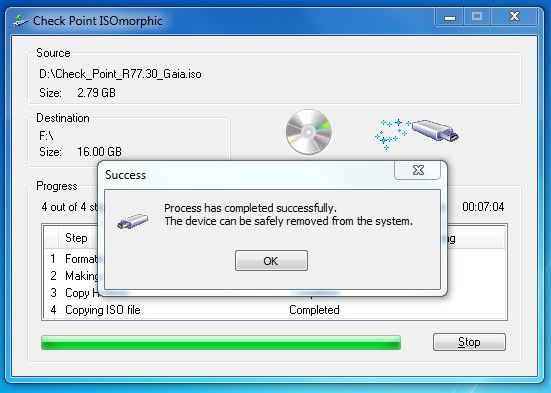
The USB drive will be formatted and prepared. The progress window is displayed.
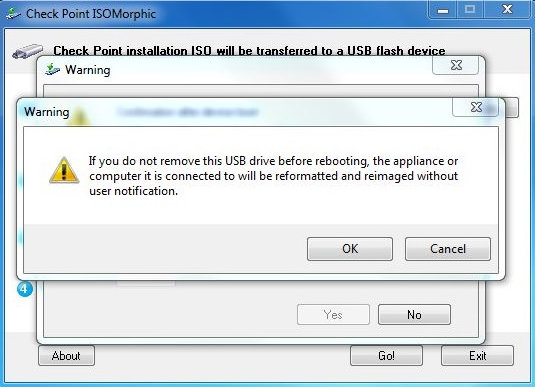
Wait until all steps are complete and then unplug the USB device from your desktop computer
Do not forget to unplug the USB device from your desktop computer after preparing it.
Important Note: Otherwise, the local drive will be formatted without any user confirmation once your desktop is rebooted.
- Turn Off your 2200 CheckPoint
- Insert your USB to the USB port at the front (for example I use the top on)
- Connect serial cable to the RS232 port of your laptop/pc or usb/rs232 adapter.
- Connect serial cable to the serial port at the front of your 2200
- Start PuTTY on your PC and set the serial settings as below

- Click session category and give a name and save if you wish the config

- Start the connection
- Power on your 2200 and watch the screen.
- All going well you will see the 2200 option running the installation until it completes. It will take some time (last one will be to set image to active)
At the end you will be prompted that installation finished successfully and orange lights on LAN port will blink in circular mode.
You can now turn off your 2200. - Connect the LAN cable to the MGNT port and boo it up!
Connect from the web GUI at IP address you ve set with any credentials you set or if default then use admin admin and 192.168.1.1
*** Complete Initial Setup *** - Install the Console Application on your PC and continue from there with updates hotfixes etc

Comments
Post a Comment